If you missed class on November 8th, please complete the following:
1. Read all printmaking related articles/posts on the blog.
2. Get the handouts and worksheets from the top drawer of filing cabinet (2 on printmaking, one safety and one safety agreement form).
3. Fill out the worksheet and sign the safety agreement form.
4. Turn in the safety agreement form.
5. Put all other worksheets and handouts in your perspective pocket.
6. Read the Notebook lesson on Ms. Burnell's computer.
7. See Ms. Burnell if you have any other questions
Thank you!
Friday, November 5, 2010

Wednesday, November 3, 2010
Miz Art ~ Printmaking
For this week's Miz Art, please complete the following steps:
1. Search for an artist that uses printmaking methods to make prints. You can look at silkscreen prints, linocut prints, lithographic prints, woodcut prints, etched prints, monoprints (or any other printmaking technique that you are interested in).
2. Find a work of art that you like by this artist and print it out (if it is not copyrighted). If it is copyrighted, email me the link to the image. Tape the image into your sketchbook.
3. Describe the artwork using your art vocabulary. Remember, we have been learning about positive and negative space, value, line, texture, form, shape, composition, symbolism, complementary colors, color psychology and more.
You MUST have at least THREE sentences and use at least TEN vocabulary words or references.
1. Search for an artist that uses printmaking methods to make prints. You can look at silkscreen prints, linocut prints, lithographic prints, woodcut prints, etched prints, monoprints (or any other printmaking technique that you are interested in).
2. Find a work of art that you like by this artist and print it out (if it is not copyrighted). If it is copyrighted, email me the link to the image. Tape the image into your sketchbook.
3. Describe the artwork using your art vocabulary. Remember, we have been learning about positive and negative space, value, line, texture, form, shape, composition, symbolism, complementary colors, color psychology and more.
You MUST have at least THREE sentences and use at least TEN vocabulary words or references.
Tuesday, November 2, 2010
Miz Art ~ Semester Due Dates
This week's Miz Art is quite easy. Simply write the deadlines below in your notebook. Read the deadlines thoroughly - this is when everything is due! Very important information here! Make sure you label it as "Miz Art Due Dates". Thank you!
SOFT DEADLINES (Goal)
Perspective for Art I students: November 5th, 2010
Project I for Art II, III and IV students: November 12th, 2010
Printmaking for Art I students: November 12th, 2010
Project II for Art II, III and IV students: December 10th, 2010
Project III for Art I students: December 10th, 2010
HARD DEADLINES (Absolute Due Date)
Self Portrait for Art I students: November 5th, 2010
Perspective for Art I students: November 23rd, 2010
Project I for Art II, III and IV students: December 3rd, 2010
Printmaking for Art I students: December 10th, 2010
Project II for Art II, III and IV students: December 17th, 2010
Project III for Art I students: December 17th, 2010
REMEMBER that if you turn in an assignment after the hard deadline points are taken off! A project that is turned in one day late will have a 10% penalty. A project that is turned in two or more days late will have a 50% penalty!
SOFT DEADLINES (Goal)
Perspective for Art I students: November 5th, 2010
Project I for Art II, III and IV students: November 12th, 2010
Printmaking for Art I students: November 12th, 2010
Project II for Art II, III and IV students: December 10th, 2010
Project III for Art I students: December 10th, 2010
HARD DEADLINES (Absolute Due Date)
Self Portrait for Art I students: November 5th, 2010
Perspective for Art I students: November 23rd, 2010
Project I for Art II, III and IV students: December 3rd, 2010
Printmaking for Art I students: December 10th, 2010
Project II for Art II, III and IV students: December 17th, 2010
Project III for Art I students: December 17th, 2010
REMEMBER that if you turn in an assignment after the hard deadline points are taken off! A project that is turned in one day late will have a 10% penalty. A project that is turned in two or more days late will have a 50% penalty!
Art Show!
Everyone is welcome to view the art on display at the admin building this week. The show will be up until November 12th.
I am very proud of my hard working Meeker High School students! They are creating some amazing artwork!
I am very proud of my hard working Meeker High School students! They are creating some amazing artwork!
Wednesday, October 27, 2010
Extra Credit!
This extra credit opportunity involves perspective. Follow the steps below:
1. Find an artwork that incorporates perspective.
2. Print and tape into your sketchbook.
3. Draw with your ruler and a red marker or pen: the vanishing point and the lines leading to the vanishing points.
4. Label the artwork as 1, 2 or 3 point perspective.
If done correctly, you can earn 15 points of extra credit.
1. Find an artwork that incorporates perspective.
2. Print and tape into your sketchbook.
3. Draw with your ruler and a red marker or pen: the vanishing point and the lines leading to the vanishing points.
4. Label the artwork as 1, 2 or 3 point perspective.
If done correctly, you can earn 15 points of extra credit.
October 26th, 2010 ~ Perspective


If you missed class on Tuesday, October 26th, please search the blog for other perspective articles AND read the information below:
During the Renaissance, perspective was being discovered by artists. M.C. Escher played with perspective in his artwork. Perspective plays an important part in creating "believable" artworks.
WRITE THE NOTES BELOW IN YOUR SKETCHBOOK (and get the sketches from a classmate)
How to create a 2 point perspective drawing:
1. Draw Horizon Line and pick two vanishing points.
2. Draw a vertical line that will become the corner of the closest building. Connect the lines at the top and bottom of the line to the vanishing points.
3. Add two more vertical lines to finish your first building. These lines should be parallel to your first vertical line.
4. Distance is tricky: Divide the bottom line in half, and then in half again, and then in half again. This will make it seem as if equal-sized buildings are next to each other.
5. Now draw other lines from your main vertical line to the vanishing points to create other buildings in distance.
6. Erase your guidelines, finish the basic shapes for your buildings.
7. How you complete your artwork is up to you! Add windows, building details, people, cars, trees, and anything else that will add detail to your perspective artwork!
You can choose any of the following mediums for your perspective artwork:
* Pencil
* Pen and Ink (sharpie)
* Colored Pencil
* Collage
* Acrylic Paint
Project Requirements:
* Must use one, two or three point perspective
* Must demonstrate knowledge of CORRECT perspective
* Add detail and color (or value if you are working in black and white)
REMEMBER: Draw lightly at first! This is important because when you are ready to erase the guide lines that are unnecessary you want them to erase easily. Dark pencil marks are difficult to erase.


Student Samples from: http://www.princetonol.com/groups/iad/lessons/middle/perspective.htm
Monday, October 25, 2010
Miz Art ~ Perspective
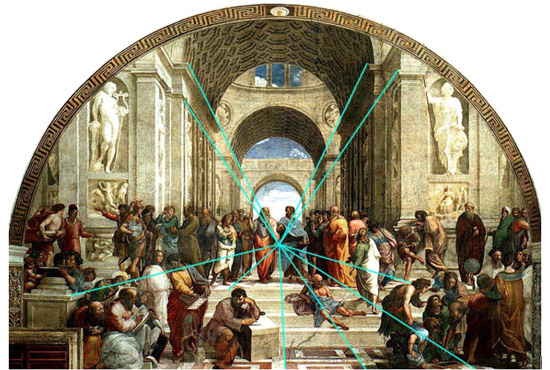
Miz Art Question # 4:
What kind of perspective does Raphael use in the painting "School of Athens"?
(This is the easiest question yet, so enjoy)
Subscribe to:
Posts (Atom)