I really enjoyed making these poems for the ones that I love. I find that every person I know has, at some time, endured something difficult. Not only have they “endured”, they’ve risen above and found strength. These poems are my tribute to them.
MY SISTER IS FIRE
A trembling in the hands
A body rebelling against itself
Cannot hide the fire within
Warrior woman
Fighting pain with every breath
Her existence is determination
Her essence is strength
With a bright light
She endures all
With a bright light
She climbs
My sister is not the earth
Though she is solid and strong
My sister is not the sky
Though her soul shines brightly
My sister is not the wind
Though her truth speaks to all
My sister is fire
An endless flame that warms the heart
A note to the spirit that life resides here
A light in the darkness
Strength in the face of difficulty
My sister is fire
HAIKU POEMS
CLIMB
Climb the mountain high
All has not abandoned you
The peak has beauty
Open
Just a little one
She overcomes the past
Future is open
ALL
We all have the strength
To endure life’s big lessons
Courage in our bones
GROWTH
Growth’s simple beauty
Bursting through layers of soil
Meeting the sun’s rays
JACKIE ROBINSON
Cruel and angry
Words and actions of many
Cannot stop his swing
HOW TO WRITE A HAIKU POEM:
A Haiku poem consists of 17 syllables. There are five syllables in the first line, seven in the second line, and five in the third and last line.
Showing posts with label Project Directions. Show all posts
Showing posts with label Project Directions. Show all posts
Sunday, April 6, 2014

Saturday, April 5, 2014
More on Resilience...
Here are a few articles you can read, and then write your reflections about.
This first article is from Psychology Today: The Art of Resilience. From the article: " Resilient people do not let adversity define them. They find resilience by moving towards a goal beyond themselves, transcending pain and grief by perceiving bad times as a temporary state of affairs."
A blog article by PBS about the characteristics of resilience, and how to develop it.
The Resilience Center Website.
A website devoted to Thomas Edison.
Angela Lee Duckworth Ted Talk about "Grit":
A website devoted to the ever-fabulous Maya Angelou.
Last, but not least, is a blog post from the Harvard Business Review. Of course, this article articulates WHY it is an important asset to be resilient in the modern workplace.
This first article is from Psychology Today: The Art of Resilience. From the article: " Resilient people do not let adversity define them. They find resilience by moving towards a goal beyond themselves, transcending pain and grief by perceiving bad times as a temporary state of affairs."
A blog article by PBS about the characteristics of resilience, and how to develop it.
The Resilience Center Website.
A website devoted to Thomas Edison.
Angela Lee Duckworth Ted Talk about "Grit":
A website devoted to the ever-fabulous Maya Angelou.
Last, but not least, is a blog post from the Harvard Business Review. Of course, this article articulates WHY it is an important asset to be resilient in the modern workplace.
Monday, April 30, 2012
Glazing Your Bisque-ware

After your clay is fired the first time it becomes bisque-ware. At this point you can glaze your piece.

Read the directions on the individual glaze bottles. Most glazes require three coatings, but some may require less. Make sure you shake and then stir the glaze thoroughly before applying it. Use the designated teal glaze brushes for the application.

Even though the color of the glaze seems different than what you want when it is first applied, remember that the glaze undergoes a chemical transformation during the firing and will change color. Use the glaze testers to determine which colors would look good on your piece.


Think about how you want your piece to look. Remember all that we've learned about color. You can place complementary colors next to each other to create visual impact and to draw the viewers' eyes.
Thursday, April 26, 2012
Glaze Reminder
Good morning!
This is just your friendly glaze reminder! I will be firing the kiln this afternoon. Please remember that all clay pieces must be formed by May 4th and glazed by May 18th.
Thanks and have a beautiful day!
~ Miz Burnell
This is just your friendly glaze reminder! I will be firing the kiln this afternoon. Please remember that all clay pieces must be formed by May 4th and glazed by May 18th.
Thanks and have a beautiful day!
~ Miz Burnell
Wednesday, April 25, 2012
Romare Bearden & Kindness Collages
Here is the first presentation I've made using www.prezi.com about one of my favorite artists. Enjoy!
Monday, April 9, 2012
Subtractive Sculpture


Sculpture: Modeling, Carving or Found Object.
"Modeling is additive: as it follows the logic of assembly, it accumulates substance toward achievement.
Carving, as a subtractive process, is the opposite of modeling. The effects of carving can be seen whenever meaning is created by stripping something away, or where a new form takes shape by means of removal. The subtractive (reductive) method we associate with carving can be a tool for creative destruction or a means of refinement and intensification.
The most famous description of the reductive process is Michelangelo’s image of a figure trapped inside of a block of stone. He also explained that he carved as if he were witnessing the revelation of a submerged object."
Source: www.StoneProject.org

"Atlas" by Michelangelo

"Pieta" By Michelangelo
Tuesday, April 3, 2012
Thursday, March 22, 2012
David Hockney and Photomontage


David Hockney's artwork, especially his photomontage work, has been especially influenced by the cubist works of Pablo Picasso. Trying to capture all angles of a subject, as Picasso did in his cubist paintings, Hockney produced visually captivating artwork.
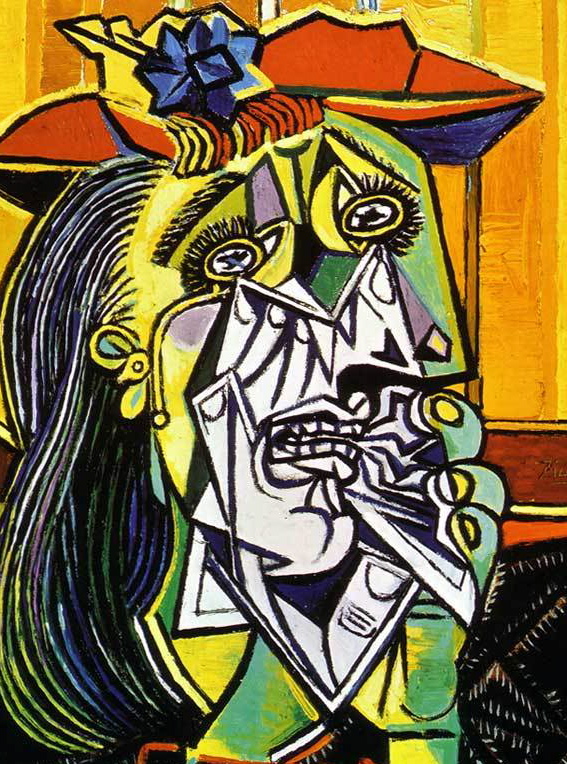
Picasso
Photomontage Project Requirements
1. Use the rule of thirds when placing your subject/focal point.
2. Correct exposures on photos (aperture, shutter speed and ISO).
3. Minimum of 20 images of the same subject, taken at different angles.
4. Be creative! Will all your images be in black and white? A mix of color and black and white? Will you change the colors of the images? Will you use borders on your photos?
5. Use a 16"x20" canvas (copy and paste and rotate images onto the canvas.
6. Use only YOUR ORIGINAL IMAGES.
7. Turn in both the PSD file and a flattened JPG.
2. Correct exposures on photos (aperture, shutter speed and ISO).
3. Minimum of 20 images of the same subject, taken at different angles.
4. Be creative! Will all your images be in black and white? A mix of color and black and white? Will you change the colors of the images? Will you use borders on your photos?
5. Use a 16"x20" canvas (copy and paste and rotate images onto the canvas.
6. Use only YOUR ORIGINAL IMAGES.
7. Turn in both the PSD file and a flattened JPG.


Art I Mask Requirements

Please note that this written work replaces your art proposal. :-)
1. Research Masks: Research and write about masks from three different cultures. Please include a visual of each mask you are writing about and include your source. When writing about the mask, be sure to include the following information:
* Country and Culture
* Purpose of mask
* Are these masks still made?
* Materials mask is made of
2. In the same document write one to three sentences about the mask you will create. What will it look like? Will you be able to wear it? What function will it serve? What forms and textures will you use? Facial expression? Symbolism?
Turn the document into the Share Drive.
3. For your mask you will need the following:
At least three forms
At least three textures
At least one symbolic element
Excellent craftsmanship
Wednesday, March 21, 2012
Masks

Benin Ivory Mask (African)

African Masks

Halloween Masks
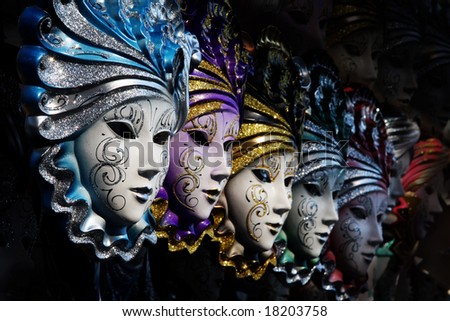
Venetian Masks

Holy Week Mask - Mexico

Mexican Mask
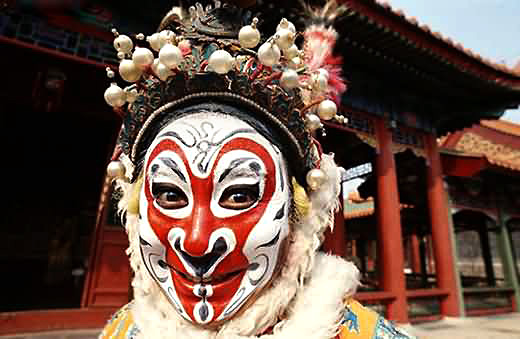
Beijing Opera Mask

African Mask

Tibetan Mask
Mask Information
We wear different masks for different relationships.
In essence, everyone sees a “mask” of us, because nobody knows what we’re really thinking except us.
WE WEAR THE MASK
by: Paul Laurence Dunbar (1872-1906)
We wear the mask that grins and lies,
It hides our cheeks and shades our eyes--
This debt we pay to human guile;
With torn and bleeding hearts we smile
And mouth with myriad subtleties.
Why should the world be over-wise,
In counting all our tears and sighs?
Nay, let them only see us while
We wear the mask.
We smile, but oh great Christ, our cries
To Thee from tortured souls arise.
We sing, but oh the clay is vile
Beneath our feet, and long the mile;
But let the world dream otherwise,
We wear the mask!
Research Paul Laurence Dunbar. What is he speaking of when he refers to "the mask"?
Friday, March 16, 2012
Stop Motion Deadlines
Script and Storyboards - March 19th
Background and prop assembly - April 6th (one week - remember we get a week off for spring break)
Character creation - April 13th
First 5 seconds (120 shots/photos) - April 27th
30 seconds (720 shots/photos) - May 11th
Editing of images/animation - May 18th
Addition of sound effects and/or music - May 23rd
Addition of end credits - May 24th
Completely edited animation - May 25th
This project will be a great way to work cooperatively with your peers (and have fun while at it). However, for us to accomplish our goal, we must make sure we are 100% on task and that everyone is doing their part. The deadlines above are when a certain element is due, to keep everyone on track. However, if you want to assign two people to create your characters, two people to create the background and two people to create props, this may be a great way to use your time and resources.
Remember when you start shooting to mark where the tripod will be located, as well as mark where your shots are taken so you can have the exact frame as the previous day. If you need help with anything, just ask!
Have a great weekend!
Background and prop assembly - April 6th (one week - remember we get a week off for spring break)
Character creation - April 13th
First 5 seconds (120 shots/photos) - April 27th
30 seconds (720 shots/photos) - May 11th
Editing of images/animation - May 18th
Addition of sound effects and/or music - May 23rd
Addition of end credits - May 24th
Completely edited animation - May 25th
This project will be a great way to work cooperatively with your peers (and have fun while at it). However, for us to accomplish our goal, we must make sure we are 100% on task and that everyone is doing their part. The deadlines above are when a certain element is due, to keep everyone on track. However, if you want to assign two people to create your characters, two people to create the background and two people to create props, this may be a great way to use your time and resources.
Remember when you start shooting to mark where the tripod will be located, as well as mark where your shots are taken so you can have the exact frame as the previous day. If you need help with anything, just ask!
Have a great weekend!
Thursday, March 15, 2012
Rule of Thirds
Rule of thirds from Jayne Whitelock on Vimeo.
In our classes learned about, and continually use, the rule of thirds. Here is a video tutorial explaining the rule of thirds. Photography, animation, film, painting, printmaking, drawing: the rule of thirds applies to all!
Stop Motion Animation Requirements
1. At least 30 seconds of completely edited animation.
2. A complete and well thought out background/set.
3. Props.
4. Minimum of one developed character.
5. Plot/Theme/Climax/Storyline.
6. Voice over and/or sound effects.
7. At least three different shot angles (close up, panning, long shot, etc.)
8. Craftsmanship - Well-made characters, set, props. No "shaking"/movement in the movie. Smooth editing. Interesting story. Overall - BEST EFFORT.
9. Ending credits.
You will be graded on your individual effort as well as the final group project. Every person should be participating cooperatively. It's all about the teamwork! This should be loads of fun! Let's get started!
2. A complete and well thought out background/set.
3. Props.
4. Minimum of one developed character.
5. Plot/Theme/Climax/Storyline.
6. Voice over and/or sound effects.
7. At least three different shot angles (close up, panning, long shot, etc.)
8. Craftsmanship - Well-made characters, set, props. No "shaking"/movement in the movie. Smooth editing. Interesting story. Overall - BEST EFFORT.
9. Ending credits.
You will be graded on your individual effort as well as the final group project. Every person should be participating cooperatively. It's all about the teamwork! This should be loads of fun! Let's get started!
Thursday, March 8, 2012
Ceramics Basics


BASICS
Low Fire Clay is usually for form (or sculpture)
High Fire Clay is usually for function (dishes or outdoor sculpture)
Why? Earthenware clays (low fire) melt at such low temperatures that they seldom become fully vitrified. Because of this, the fired piece will continue to absorb liquids.
We will be using low fire clay in class. DO NOT PUT THE PIECES YOU MAKE IN THIS CLASS IN THE DISHWASHER, OVEN OR MICROWAVE!
Vitrified: To change a substance so it becomes glass or a glassy substance, usually through heat fusion.

Clay: Alumina + silica + water
CLAY STAGES:
Wedging: A method of kneading clay to prepare it for use. Wedging presses the air bubbles out of the clay. If you have air bubbles in your clay it will explode during firing.
Leather Hard: Stage of the clay between plastic and bone dry. Clay is still damp enough to join it to other pieces using slip. For example, this is the stage handles are applied to mugs.
Bone Dry: Completely air dried.
Greenware: This refers to ceramic ware that has not been fired.
Firing: This is the process of heating the pottery to a specific temperature in order to bring about a particular change in the
clay or the surface. Clay is fired in a kiln. Do NOT touch the kiln!
Bisque: The term bisque refers to ceramic ware that has been fired once without glaze.
Glaze: A glass-like surface coating for ceramics that is used to decorate and seal the pores of the fired clay.

TECHNIQUES
Score and Slip: Score and slip refers to a method of joining two pieces of clay together. First, score the clay; this means that you make scratches in the surfaces that will be sticking together. Then you slip it; that is you wet the surface with some slip, using it like glue. Next, you press the two pieces together. It is very important to always score and slip clay that is leather hard. If you do not, the pieces will likely pop apart when they are fired.
Coil: This is the technique of building ceramic forms by rolling out coils, or ropes, of clay and joining them together with the fingers or a tool.
Pinch: "Pinch" in ceramics is a method of shaping clay by inserting the thumb of one hand into the clay and lightly pinching with the thumb and fingers while slowly rotating the ball in the palm of the other hand.
Pots made in this manner are called "pinch pots".
Handbuilding: This term refers to the one of several techniques of building pots using the only the hands and simple tools rather than the potters wheel.
Molding: In this technique, flat slabs of clay are pressed into molds in order to create various shapes or forms.
Throwing on the Potters Wheel: A device with either a manual (foot powered) or an electric rotating wheel head used to sit at and make pottery forms. Potters create vases, pots, bowls, platters and so on by throwing on the potters wheel.

CLEAN UP
1. Put excess clay in a bowl. At the end of the class period wedge the clay and put back into your bag. If clay is excessively wet you may put it on the plaster for the class period and put it in the bag at the end of class.
2. Clean your area by scraping off clay from the table.
3. Finish cleaning your work area by using a sponge to wipe the table off.
4. Scrape clay off of your hands and put into your bag or the large clay bin.
5. Rinse remaining clay off of your hands in the bucket.
6. AFTER you have gotten the clay off in the water bucket THEN you can wash your hands in the sink.
7. Put tools and materials away.
DO NOT PUT CLAY IN SINK
DO NOT WASH HANDS IN SINK WITHOUT USING THE BUCKET FIRST!!!
Students that clean up improperly will be assigned to cleaning up the whole room.
6th Period is to dump the water bucket 5 minutes prior to the end of class each day.
1st Period is to put fresh water in the bucket every day.
CERAMICS TIMELINE
Demo on throwing first
Students will sign up to throw a pot. Each student will have 3 to 7 class periods to throw, depending on class size and wheel availability. Throwing a pot may count as a project, but is not required due to lack of sufficient number of wheels. So if you are interested in throwing, please try it!
THROWING: COPS = Center, Open, Pull, Shape.
Once leather hard you trim the bottom.
Project One: Musical Spheres or Christmas Ornament for Washington Tree Project
Score and Slip
Texture
Project Two: Subtractive Sculpture
Carving
Form
Negative and Positive Space
Project Three: Mask
Mold
Score and Slip
Texture
Sculpting
Expression
Project Four: Vessel Construction
Hand building
Slabs
Score and Slip
Texture
Sculpting
IMPORTANT: It's important to never have clay over 1" thick and that there are no air bubbles in the clay! Enclosed sculptures MUST have a hole to let out hot air. If the clay is too thick or there are air bubbles in the clay, it will EXPLODE during firing! This will ruin not only your work of art, but everyone else's as well.
If your work explodes you must redo the assignment and apologize to everyone else that had damage done to their artwork.
Each student will get 25 pounds of clay (one bag).
This is enough to finish all of your projects.
Do not punch or poke holes into your clay.
Wrap back up after each use!
Clean up your work area every day!
Students no responsible with clay usage will be assigned to other projects for the rest of the semester.
Monday, February 27, 2012
3rd Quarter Deadlines
DUE MARCH 9th (in addition to earlier projects):
Art I:
Shoe Project
Art II, III & IV:
Two large or four medium or six small projects
Art I:
Shoe Project
Art II, III & IV:
Two large or four medium or six small projects
Yearbook due this week!
Good morning!
Yes, the time has come! After all of our hard work and dedication, it's time to turn in the whole yearbook! While most of the pages have been completed and turned in, we still have a few more to go. Let's work together and finish our yearbook as a team! It's looking fabulous and I appreciate each and every one of you!
Yearbook Deadline: March 2nd, 2012
Yes, the time has come! After all of our hard work and dedication, it's time to turn in the whole yearbook! While most of the pages have been completed and turned in, we still have a few more to go. Let's work together and finish our yearbook as a team! It's looking fabulous and I appreciate each and every one of you!
Yearbook Deadline: March 2nd, 2012
Thursday, February 23, 2012
Yearbook deadlines
Good morning!
We are getting close! March 2nd is our final yearbook deadline. Most of you are done with your pages, but for those that aren't yet, keep plugging away! Thank you for all of your hard work and dedication! GO YEARBOOK!
~ Ms. Burnell
We are getting close! March 2nd is our final yearbook deadline. Most of you are done with your pages, but for those that aren't yet, keep plugging away! Thank you for all of your hard work and dedication! GO YEARBOOK!
~ Ms. Burnell
Thursday, February 9, 2012
Product Design Project

1. Be creative and unique.
If you want your product to be patronized by many, you can start with a creative packaging. Some products have mazes, crossword puzzles and others to encourage consumers to buy the item. Some even have collectibles with it so that they have to complete a certain collection like cards, paper dolls, and others. You can use a variety of shapes in your packaging, too.
2. Choose the colors and fonts.
Choose the color that suits the product. The text should be clear and readable. Example: Do not use orange text on a red background for it won’t be readable. Choose the right font that will best represent the product. Do not use fancy fonts that could be too hard to read.
3. Make sure labels are easy to read.
4. Use images.
You may include images in your packaging designs. It could be a cartoon, a picture of the product, a picture of the model or whatever. Just make sure it is of high resolution and would look good no matter how big or how small it will be used. Also, the picture should be appropriate for the product to avoid confusion.
5. Have relevance.
Choose the right image, font style, colors and design that would suit the product. It should have relevance to the type of product you are selling. Do not place an image of a dog when you are to make a packaging design for hotdogs. You will mislead the consumers and they won’t like to buy it thinking that it is dog food or is made of dog meat. So, be careful.
6. Use the right language.
Choose a language that is fitting to the product. Consumers are literate and informed. Do not say delicious when you are referring to a hard drive or a flash drive. You have to be careful with your language. Also use the right spelling and grammar. Most products with erroneous packaging came from sources that have low quality. Be careful with this. You’ll gain the trust and confidence of the consumer if you use proper grammar and language.
7. Make it convenient.
Be sure that your packaging is easy to use and convenient. Remember that most people who will use these products are busy people. So make their lives easier. Do not make a design that is so large and would be hard to carry. The handier it is, the more clients would prefer to buy it compared to the bulky ones. Make a packaging that is simplified.
8. Make sure it doesn’t look tampered.
Product security is very important. It should always be sealed for consumers wouldn’t buy that if it looked opened or tampered. You have to make sure that the design you’ll make for packaging will keep the product secured. You’ll have trouble selling the product if it looks tampered. You’ll have a big problem with that. So, in making your design, consider how it could be sealed and how to protect the product inside it.
9. Make sure it is easy to open.
Even if you are ensuring that your product is protected and will not be tampered, you still have to make sure that it is easy to open when consumers use it. These people are busy and don’t want to spend much time just to figure out how to open the packaging of the product they bought. Leave some instructions as to where to tear and how to open it. Even if it is already self-explanatory, just place those texts so that it could serve as a guide to the consumers.
10. Keep it simple.
Make the design simple yet striking. You should also make it easier for both kids and adults to utilize. Make it easy to handle. Use different colors for color coding. A simpler design with the right labels and contents will have a better impact than a crowded one.
Since a product’s packaging is important in order to sell the product, designers should consider the above mentioned things in order to come up with an effective and functional design. While making it, you should have a good coordination with your client and you should also make sure that the design you will make will suit the product and the client’s preferences. Do you have other tips to share for a better packaging design?
Source: Naldz Graphics
Requirements
1. PLAN your package design in a word document. This document should outline the following:
a) What is your product?
b) What makes your product unique?
c) Who is your target market?
d) What color scheme will you be using
e) What size will your package be?
f) What shape will the package be?
g) How will the package be assembled?
h) What materials will the package be made of?
2. Create the label for your package in Photoshop.
3. Create the package itself using paper. This will require math skills.
4. Apply the label to the paper package.
5. Remember you are graded on everything in number one, as well as originality, craftsmanship and all the tips and ideas outlined in the lesson (relevancy, easy to open, etc.).
DUE: February 24th, 2012
Helpful articles and websites:
Smashing Magazine
25 Examples of Amazing Product Design


Subscribe to:
Posts (Atom)